In the spring time, even the most lackadaisical gardeners get ambitious, thinking this will be the year we finally live up to our ambitions of year-round backyard salads and shelves lined with jars of pickles and preserves made from produce we grew. If you have any crafty bones in your body—and if you’re reading this, you probably do—the itch to throw seeds in the ground may be accompanied by an equally intense itch to make something useful in the longer, sunnier, dryer hours of spring.
Why not do both? That is, why not try a DIY project that both satisfies the urge to make something tangible and useful and helps you get garden-ready this spring?
We reached out to the ReBuilding Center, which regularly offers cedar garden box classes as part of its Sustainable Crafting and Woodworking series. (You can also learn to make lamps, tables and shelves at the RBC; the nonprofit also offers home repair courses that address topics like drywall repair, plumbing and electrical repair.) These three-hour classes are offered on a sliding scale (starting at $75 and topping out at $190); that fee includes all course materials, which means you walk out of the building with a roughly 1½-by-3-foot box ready for planting.
The following tutorial is adapted from RBC’s curriculum. While there’s no substitute for an in-person class, the instructions are simple and adaptable; you can make a smaller box, or a bigger one, depending on your particular needs and vision for your garden. (A bit of advice from personal experience: think ergonomically. If you end up building a box that’s too wide or too short, you may find yourself kneeling lower or reaching farther than your body can handle.)
If you’re a novice gardener, you may be wondering why you’d want a garden box (also called a raised bed) at all; why not just throw some seeds or plant starts directly into the ground? There are a lot of reasons. First, filling a raised bed with purchased soil reduces the likelihood that your cucumbers and lettuce are growing in toxic soil. Second, the soil of the Pacific Northwest often doesn’t offer optimal drainage; a raised bed mitigates that concern too. Third, raised beds are easy to adapt to a variety of gardeners’ needs. You can build them high enough that you never have to kneel; you can put a garden box on a table or bench, making your garden accessible to those with mobility devices.
The possibilities are nearly endless. Here’s one beginner-friendly way to do it, adapted with help from RBC program manager Zarina Khalfan.
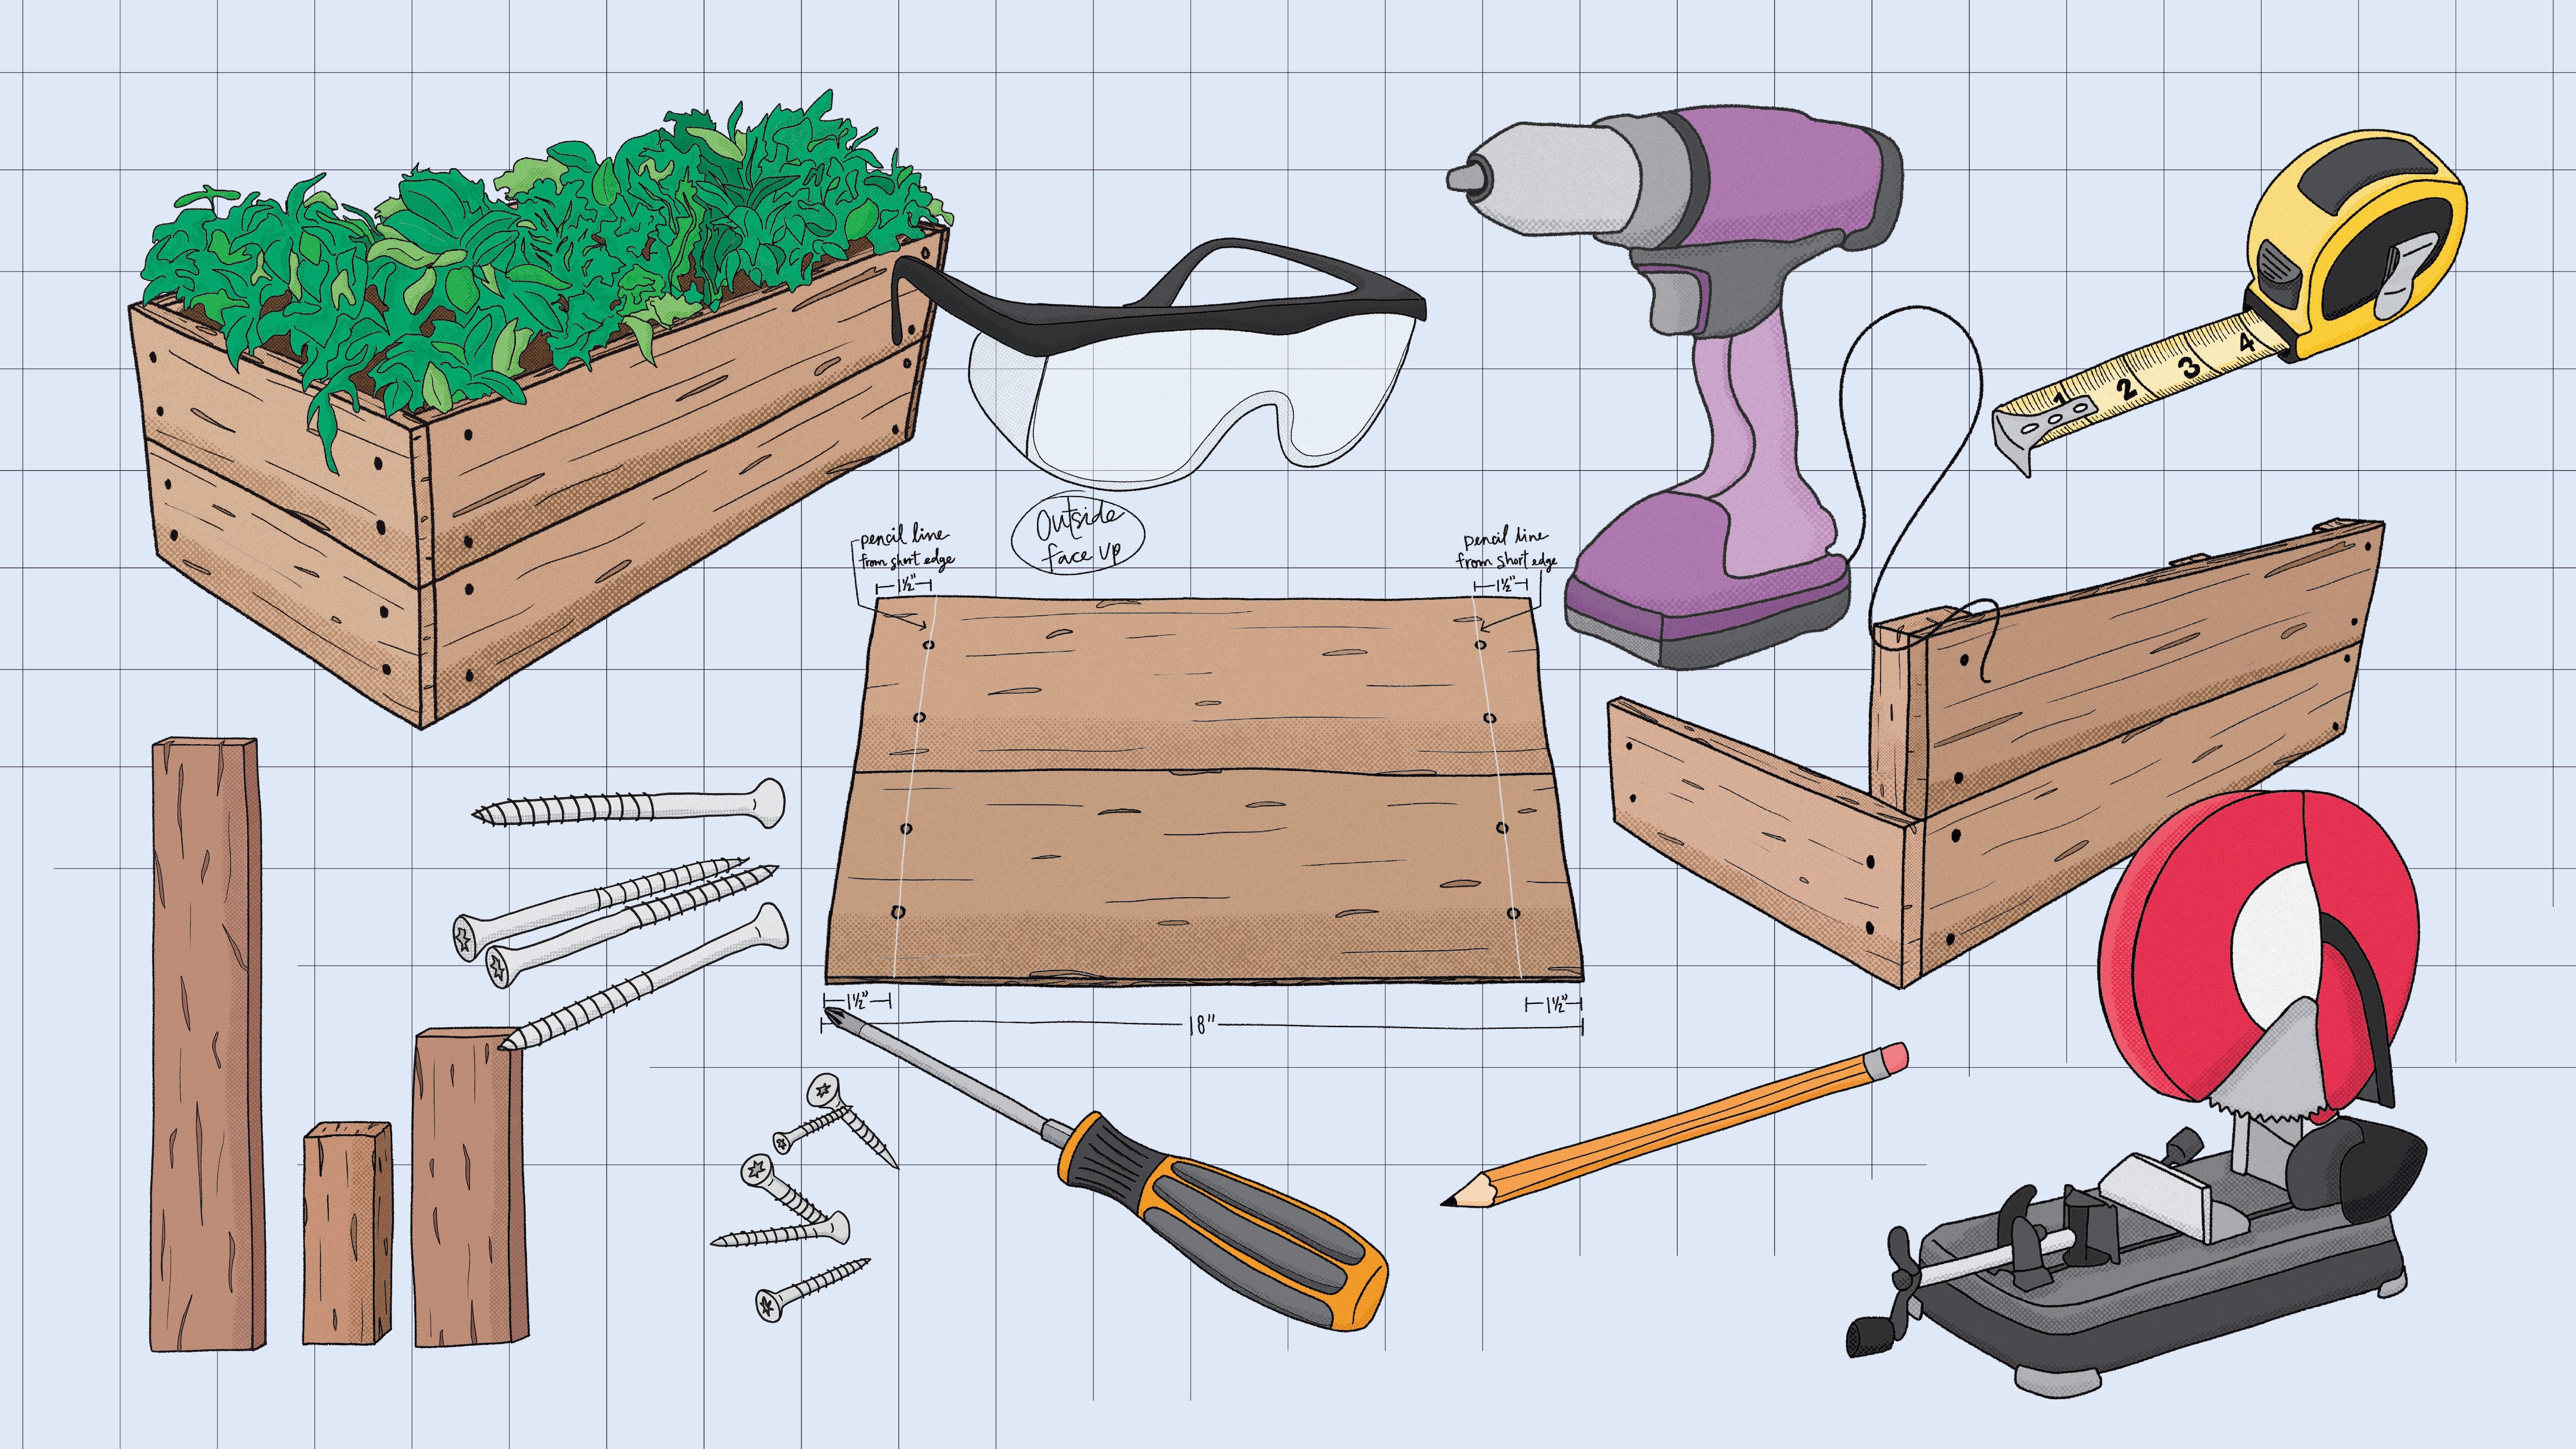
Here’s what you need to get started:
Wood:
- 4: 36-inch 1x6 boards
- 4: 18-inch 1x6 boards
- 2: 11-inch 1x3 boards
- 4: 11-inch 2x4 boards
A word about wood: The folks at the RBC recommend cedar, redwood or juniper for this project. These are more rot-resistant than other woods. Also, avoid using reclaimed woods that may have been treated with chemicals; you don’t want that stuff leaching into the soil.
This tutorial gives the dimensions of the finished boards you need to start your project. If you have a chop saw, you can purchase 18 linear feet of 1x6 wood, 2 linear feet of 1x3 wood, and 4 linear feet of 2x4 wood. Lumber stores (Parr Lumber and Mr. Plywood as well as big-box chains) are usually happy to cut boards to the lengths you request, sometimes for a small fee, so you don’t have to own a power saw to get started.
Screws:
- 32: 2-inch exterior screws
- 8: 1¼-inch exterior screws
Tools:
- Drill
- Screwdriver with a bit that matches your exterior screws
- Tape measure
- Speed square
- Pencil
- Safety glasses
- Earplugs
Step 1. Prepare the long sides.
Take the two 11-inch 1x3 boards and measure 5½ inches from either end to find the midpoint. Drill four pilot holes all the way through each piece—two above the midpoint and two below.
Separate the 36-inch 1x6 boards into two sets of two. Decide which side of each board should face inside, and set them on your table (or other work surface) with the INSIDE surface facing up.
Line up two of the 36-inch boards so their ends are flush. Measure 18 inches from either end to find the midpoint; attach one 1x3 board at the midpoint using the 1¼-inch screws in the pilot holes.
Do the same for the second set of 36-inch boards.
Step 2. Attach the corners.
Flip the two 36-inch sides over so the OUTSIDE surface of the box is face up. Position two 2x4 boards flush along each short edge.
Measure in 1¾ inches from the edges. Use a straight edge to draw a light pencil line parallel to the end of the boards. (You might want to erase this line later.)
Using the pencil line as a guide, drill four pilot holes on each side of the board, then use the 2-inch screws to attach the sides to the 2x4 boards.
Do the same for the second set of 36-inch boards.
Step 3. Prepare the short ends.
Take the shorter 1x6 boards and separate them into two sets of two. Decide which sides will face outside and set them OUTSIDE face up on your table or work surface.
Measure in 1½ inches from the ends. Use a straight edge to draw a light pencil line. (You might want to erase this one, too.)
Drill pilot holes along the pencil line.
Step 4: Put the four sides together.
Set one of the 36-inch sides upright. (If you have a scrap piece of wood and some clamps, consider bracing the 36-inch piece against it so you have a “fence” while you do this part.) Position one of the 18-inch sides against the end, drill pilot holes, and use the 2-inch screws to attach it to the 36-inch side. Do the same thing with the other two sides. (Be careful about where you place these screws; you don’t want them to bump into the screws you used to attach the long side to the 2x4 boards earlier.) During this step, try to put all the screws in most of the way, then go back and tighten them.
Now attach the 18-inch sides to the ends of the box. You’re done! Now fill with soil and compost, and get to planting.
Nester, Makers Edition Magazine is free, distributed all over Portland, and can be found at these locations. Love Nester? Save the date for NestFest, where we bring the magazine to life at an event in Fall of 2026.